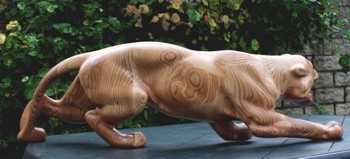
Ash Tiger - 3D Scanning and 3D Machining
This was a project to see what could be achieved using a 3 axis machine. This work really required a 5 or 7 axis machine. I will take you through the major steps but I can tell anyone out there thinking of doing this, your in for a major headache.
The subject:
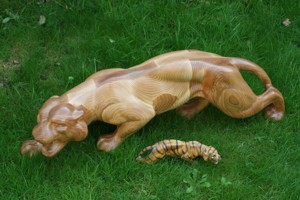
The tiger is an ornament left to me by my grandfather. It was chosen for a few reasons: Firstly I like it, secondly it is a complex shape, thirdly it is a strong smooth shape with no small thin bits that could break off.
Creating the 3D file:
This is not possible unless you have a 3D scanner, well we do (a separate section covers this). There were 7 scans in total that had to be pieced together to make one complete 3D object.
Next dilema:
Now I have the file, it is a decision on what material and size do I chose. I decided that Ash has a long grain and will give a nice finish. Size? Well I thought the same size as the dog we had just lost, about 1m (it looks nice in front of the fire).
Testing:
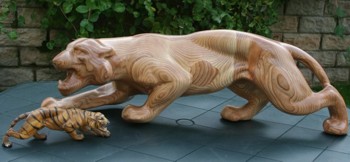
As this was a complex project, a test in MDF would show me the method and any problems I would come across. Well the short version is that it is in the workshop, not quite finished.
Creating the stock:
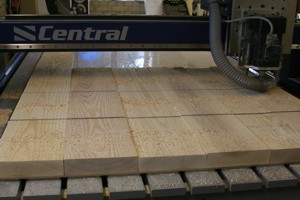
Firstly I had to decide where to split the tiger. I chose down its length in 45mm chunks, (I could get Ash 50mm thick). Next I created a profile of the longest side of each section, this gave me the amount of material that I would need.
Down to the hard wood specialist to pick the Ash. This is not easy as you can't tell what it will look like until it's planed, so this is a pick and hope job. Now I have the timber. First thing to do is plane it flat. Then decide what goes where. I decided that it would be best with the grain going down the tiger (help with the stripy look!). Therefore I needed to square the edge and make a big flat block.
This was then split into 3 sections. Now I could see roughly where the grain would go down the back of the tiger. I tried to get a wavy look.
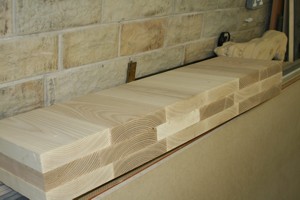
Then using the profiles I made the decision as to which bit to cut from where, to give me the best look.
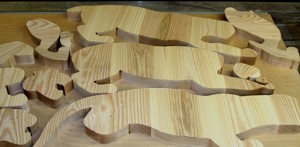
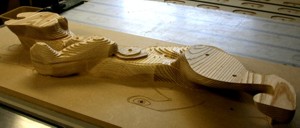
Cut out the section:
Simply cut out the sections! Well not that simple as this is going to have to fit together, you need an accurate positioning system, so you know where the shape is on the table. I positioned peg holes in various locations that could also be used later to fit it all together. Oh! also a pair of base boards (one a mirror image of the other) that match the pegs. I also put a fine line on this to help to see which bit went where.
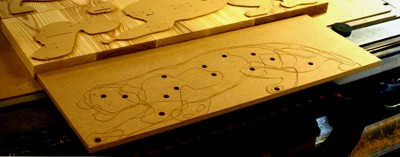
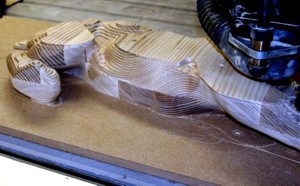
Machining:
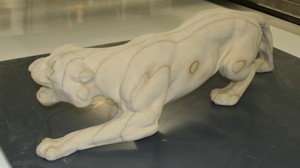
I started from the centre, the first of many 3D programmes. Remember, most parts have to be machined both sides so a decision on which side you cut first could be vital to the stability of the part when turned over, and machined on the other side. How to cut what, when, where, how, is a decision that I made as I was doing it. One bad tool path could destroy the job. Pressing the start button gets worse the nearer you get to the finishing post.
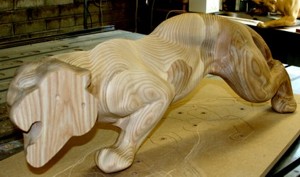
Gluing:
Another problem is gluing all the bits together as some parts bow when they are removed from the table, especially when it goes from thick to thin. Also the clamps tend to slip as you tighten them up because of the uneven surfaces on both sides so a clamp test before applying the glue was needed.
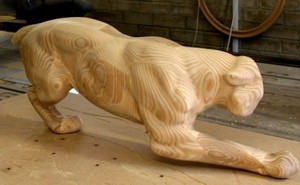
Finishing:
I hadn't realised how tough Ash was to sand.
This was just hard work and patience. Finally I decided to go with the clean duck oil finish. She now stands in front of our fire guarding the house.
|